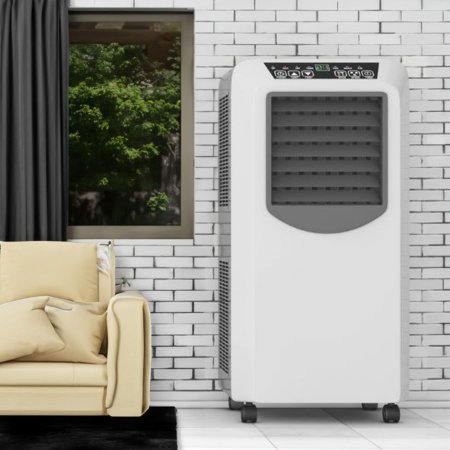
Draining a Toshiba Portable Air Conditioner is an important maintenance step that ensures the unit operates efficiently and has an extended lifespan.
This document will guide you through the simple yet crucial process of draining your Toshiba Portable Air Conditioner.
Over time, moisture from the air can accumulate inside the unit, requiring regular draining to maintain its performance.
Whether you’re a seasoned DIYer or a beginner, this step-by-step guide will make the draining process effortless, helping you achieve a cooler and more comfortable living space.
So, let’s dive right into the process and learn how to drain a Toshiba Portable Air Conditioner.
Key Points
- Ensure the Portable Air Conditioner is Unplugged: Always prioritize your safety first.
- Locate the Drainage Port: Usually found at the back of the unit.
- Prepare a Drainage Container: This will collect the water from the unit.
- Remove the Drain Plug: Carefully remove the plug to start draining.
- Re-Insert the Drain Plug: Do this only after the unit is completely drained.
- Clean the Drainage Port: Use a damp cloth to wipe the area around the drainage port. This will prevent any buildup of dirt or mold that could affect the unit’s operation.
- Check the Unit for Any Leaks: After re-inserting the drain plug and cleaning the drainage port, run the air conditioner to ensure no leaks.
How To Drain A Toshiba Portable Air Conditioner?
Before starting, ensure you have a bucket or a drain pan to collect the water and a dry towel to clean up any potential spills.
Remember, safety first! Always turn off and unplug the air conditioner before beginning the draining process.
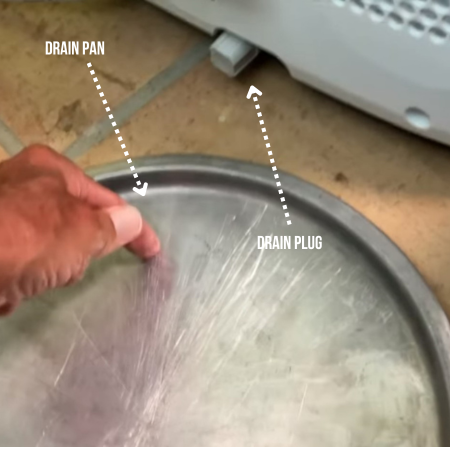
Step 1: Locate the Drain Plug
Your Toshiba Portable Air Conditioner will have a drain plug. This is located at the bottom of the unit. You might need to elevate the unit or bend down to see it.
The plug is typically small and round. It might also be covered with a rubber cap for safety.
Place your bucket or drain pan underneath this plug to keep the area mess-free. Make sure the bucket is large enough to hold the water. This will prevent any water from spilling onto your floor.
Next, remove the rubber cap covering the drain plug. Use a gentle twisting motion. Be careful not to lose the cap. It’s small and easy to misplace.
Once the cap is off, water will begin to flow out from the plug. Let the water drain completely. This could take a few minutes.
After the water has drained, replace the cap. Make sure it’s secured tightly. This will prevent any future leaks. You have now successfully drained your Toshiba Portable Air Conditioner.
Remember to clean up after. Use a dry towel to wipe down the unit. Also, clean the area around it. This will ensure it’s ready for the next use.
Step 2: Position the Drain Pan
Position the drain pan directly under the drain plug. The drain pan should be large enough to capture all the water.
Make sure the drain pan sits flat. It should be stable and not wobble. This helps avoid water spills.
Check the drain pan for any cracks or holes. You don’t want any leaks.
Ensure the drain pan is empty. If it’s partially filled, it might overflow.
Consider using a shallow and wide pan. This may catch any water that may splash.
If your space allows, consider using a second pan. This serves as a backup.
Always have towels handy. They will quickly mop up any accidental spills.
Remember, safety first. Keep electronics away from the drain pan.
After draining, empty the pan. Dispose of the water according to local guidelines.
Clean the pan after use. This keeps it ready for the next draining session.
Remember, a properly positioned and prepared drain pan aids the draining process. It makes your job easier and keeps your space clean.
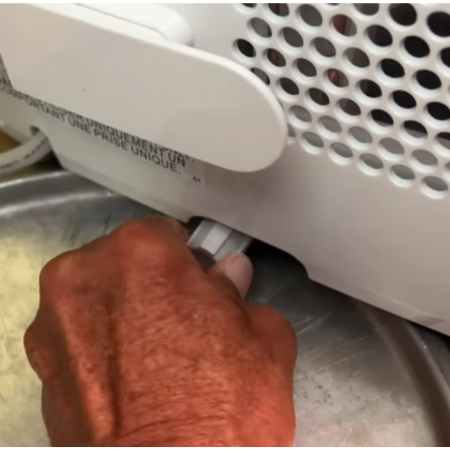
Step 3: Remove the Drain Plug
Begin by locating the drain plug on your Toshiba Portable Air Conditioner. It’s typically at the base of the unit. Hold the drain pan in one hand. Use the other to remove the plug.
Be careful when unscrewing the plug. Turning it counter-clockwise loosens it.
Don’t use force to remove the plug. It should come off with ease. Check whether you’re turning it the right way if it’s tough.
Once the plug is loose, pull it out gently. Make sure the drain pan is in position. Water will begin to flow immediately.
Watch the water flow. It should go directly into the drain pan. If it splashes, adjust the pan position.
Keep a firm grip on the plug. Don’t lose it in the draining water.
After draining, insert the plug back. Turn it clockwise to tighten. Ensure it’s secured tightly.
Inspect the unit for any leaks. If you find any, tighten the plug further.
Congratulations! You’ve successfully removed and replaced the drain plug. This is a crucial step in maintaining your Portable Air Conditioner.
Remember, safety is important. Handle the plug with care to avoid damaging the unit.
Keep your workspace clean. Wipe any splashes immediately. Dispose of the drained water safely.
Step 4: Allow Water to Drain
After removing the plug, let the water drain. It may take some time, be patient.
While the water is draining, observe the flow. Make sure it’s going into the drain pan. If not, adjust the pan’s position.
Water flow can vary. If it’s draining slowly, this is normal. Don’t attempt to speed up the process.
Avoid moving the air conditioner during this time. It could interrupt the draining process.
Allow all water to drain completely. Check the drain hole to ensure it’s empty.
Once all the water has drained, you’re ready for the next step.
It’s important to wait until the water has completely drained. Rushing can cause problems.
So, give it time. You’re doing great.
Remember, your Toshiba Portable Air Conditioner needs this care. Draining the water extends its lifespan.
You’ve done an excellent job so far. Keep up the good work.
Only a few more steps to go. Soon your air conditioner will be ready to cool your space again.
Once the draining is complete, you can replace the plug. But remember, don’t rush.
Your patience will pay off with a well-maintained unit.
Now, onto the final steps. Well done on completing this crucial step.
Step 5: Replace the Drain Plug
Great job so far! Now, for replacing the drain plug.
Pick up the drain plug. You kept it safe, right? Good. It’s an important piece.
Check its condition. Ensure no damage. Visible wear? Replace it.
Let’s proceed. Align the drain plug with the drain hole. It should fit snugly.
Push the plug-in. Use gentle force. You don’t want to damage the unit.
Ensure a secure fit. The plug should be flush with the unit. No water should escape.
Check the plug. It should sit comfortably. It should not stick out.
The plug is important. It prevents leakage. It also protects the internal components.
Once the plug is in, do a quick check. Is everything in order? Great.
This step is done. You’ve done well. Your air conditioner is one step closer to being ready again.
This step is crucial. It ensures the efficient functioning of your air conditioner.
Well done! You’re doing great. Only a few steps left now.
Keep up the good work. Your efforts will ensure a longer lifespan for your air conditioner.
Step 6: Clean Up and Restart the Air Conditioner
You’re almost there! Time to wrap up. Clean up first. Gather all your tools. Put them away. Don’t lose them. You’ll need them next time.
Now, focus on the air conditioner unit. It should be dry. Any water left? Wipe it down. Use a dry cloth for this. Ensure the unit is completely dry. Now, let’s restart the unit.
Find the power button. It’s time to switch on your air conditioner. Push the button. Wait for a moment. The unit should hum to life. Feel the cool air? That’s your success!
But wait, don’t leave just yet. Pay attention to the unit. Listen for any unusual sounds. Check for any leaks. Everything seems fine?
Congratulations! You’ve successfully completed the maintenance. Your air conditioner is ready. It’s all set to cool your space again.
This successful maintenance means a longer lifespan for your air conditioner. This means more comfort for you.
Remember, regular maintenance is key. Repeat these steps when needed. This will ensure optimal performance. Good work! You’ve done a great job.
Conclusion
Maintaining your air conditioner is not a daunting task. It’s an achievable goal. Each step completed increases the unit’s lifespan.
Regular maintenance ensures optimal performance. It also means a cooler, more comfortable living space for you.
Don’t be intimidated by the process. Every step counts. You’ve learned how to complete these steps.
That’s a big win! So don’t stop now. Keep it up. Remember, your efforts will pay off. Enjoy the cool, clean air.
You’ve earned it! Keep up the good work. The reward is worth the effort.

- GE Profile Microwave Troubleshooting 4 Common Issues - September 3, 2024
- How to Microwave Toaster Strudel at Home - September 2, 2024
- How to Improve Microwave Exhaust Fan Efficiency? - September 1, 2024