Air conditioners are essential for maintaining a comfortable indoor temperature, especially in the warmer months.
However, like all appliances, they require regular maintenance to function optimally.
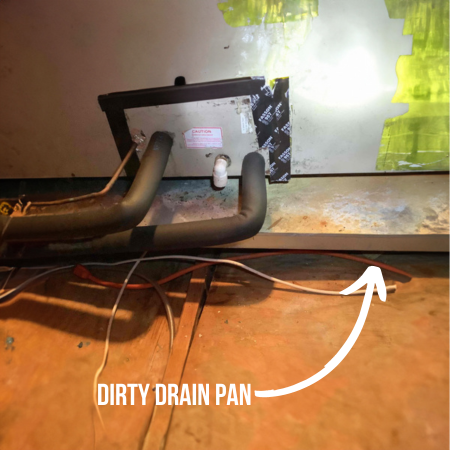
One part that often needs replacing is the drain pan, which collects condensation produced during the cooling process. How to Replace Air Conditioner Drain Pan?
A damaged or overflowing drain pan can lead to water damage and mold growth, which can be expensive and potentially hazardous to health if not addressed promptly.
In this article, we’ll walk you through the steps of replacing an air conditioner drain pan, ensuring your unit continues to operate efficiently and safely.
Key Points
- Turn off the AC unit: Always prioritize safety when working.
- Remove the old pan: Handle carefully to prevent spillage.
- Install the new pan: Ensure it’s positioned correctly, and check for leaks.
Diagnosing Faulty AC Drain Pans
Signs of a Faulty AC Drain Pan
Identifying a faulty AC drain pan early can help prevent significant damage. Here are several signs to watch for:
- Water Leaks: If you notice water pooling around your air conditioner, it could indicate a damaged drain pan. Water can seep through even tiny cracks, causing leaks.
- Increased Humidity: A high humidity level in the room may indicate that your AC’s drain pan is not effectively collecting and draining the condensation.
- Unpleasant Odors: A musty smell in your home could be a sign of mold or mildew, which may form as a result of a faulty drain pan causing dampness.
- AC Performance Issues: If your air conditioner isn’t cooling your home effectively, it could be due to a variety of issues, one of which might be a damaged or overflowing drain pan.
How to Replace Air Conditioner Drain Pan: A Step-by-step Guide
Before you start, ensure you have the appropriate replacement drain pan readily available.
This guide provides an easy-to-follow process to replace your air conditioning unit’s drain pan.
If you are unsure or uncomfortable performing any of these steps, consulting with an HVAC professional is advised.
Step 1: Turn Off the AC Unit
Always start with safety first. Ensure the AC unit is completely turned off. This step is crucial, as it prevents any potential electrical shocks during the repair process.
Locate the power switch or breaker for your AC unit. If your unit doesn’t have a specific power switch, it’s likely connected to a breaker in your home’s electrical panel.
Switch it to the off position. Some units may require you to pull the switch. Remember, you’re dealing with electricity here, so it’s important to be cautious.
Verify that the power is off. You can do this by turning on the AC unit. If it doesn’t start up, you’ve successfully turned off the power.
If you’re unsure about any of these steps, don’t hesitate to consult with an HVAC professional. They can guide you through the process safely and effectively. It’s better to be safe than sorry.
With the power safely turned off, you’re ready to proceed to the next step. Remember always to take proper safety precautions when working with electrical units.
Step 2: Remove the Front Panel
The front panel is the next hurdle. It shields the internal components of your AC unit. You’ll need to remove this to access the drain pan.
Start by locating the screws that secure the panel. These are usually found around the edges. Use a screwdriver that fits the screws. Be careful not to strip them.
Now, begin unscrewing. Keep the screws in a safe place. You don’t want to lose any! It’s also a good idea to remember the order in which you removed the screws. This will make reassembly easier.
After all the screws are out, gently pull the panel off. Some models might have clips or hooks. These need to be carefully unhooked to free the panel.
Remember, the panel can be heavy. Use both hands for this task. If it’s too heavy or awkward, ask someone for help. Safety first!
With the panel off, you should now see the interior of the AC unit. The drain pan is usually at the bottom. Now, you’re ready for the next step.
Remember, if you feel uncertain, call an HVAC professional. They can help with tips or take over the job.
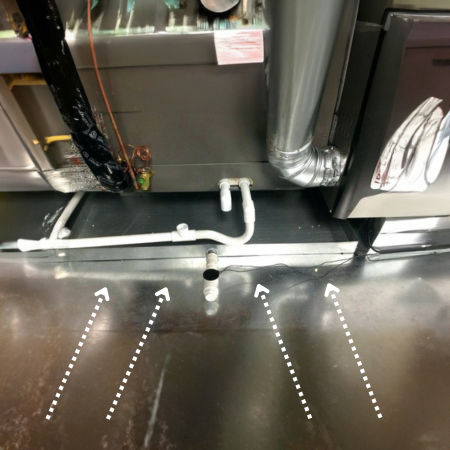
Step 3: Locate and Remove the Old Drain Pan
The old drain pan’s location is typically at the bottom of the unit. Look for a flat, tray-like component. This is your target.
Start by identifying any screws or clips holding the pan in place. Use your screwdriver to remove these carefully. Keep these screws safe – you’ll need them later.
Next, slowly begin to slide the pan out. Be careful, as it may contain water or debris. Wearing gloves can protect your hands during this step.
If the pan doesn’t move easily, don’t force it. Check for any additional fastenings, and remove them if present.
Once free, gently lift the pan out of the unit. Be mindful of any sharp edges. Again, safety is paramount.
Inspect the old pan. Notice any cracks or damage? That’s probably why you’re here!
With the old pan removed, you’re ready for the next step. But remember, if there are any uncertainties, reach out to an HVAC professional.
Step 4: Clean the Area
Before installing the new drain pan, it’s crucial to clean the area. Begin by using a clean, damp cloth.
Gently wipe down the area where the old pan was located. This removes any dust or debris.
Next, check the surrounding components. These include the coils. They might require cleaning as well. If so, use a soft brush. Gently brush away any dust or debris.
After dry dusting, it may be necessary to wipe down again. For this, use a clean, damp cloth. Handle the components with care.
Have a leak issue? Inspect the drain line. It’s typically connected to the drain pan. Ensure it’s not clogged. If it is, it needs to be cleaned out.
Finally, let the area dry. This is extremely important before installing the new pan. Dampness could lead to future issues.
Always remember: be gentle during cleaning. The goal here is to avoid causing any damage.
You’re ready for the next step once the area is clean and dry. Don’t forget, if in doubt, call a professional. Safety first!
Step 5: Install the New Drain Pan
Begin by positioning the new drain pan. Make sure it fits perfectly. Align it with the unit’s edges. Secure it correctly.
Now, fasten the pan. Use the screws or clips provided. Every unit is unique. Follow the specific instructions for yours.
Next, check the pan’s position. It should be flat and secure. No wobbling or tilting. Correct fitting is crucial.
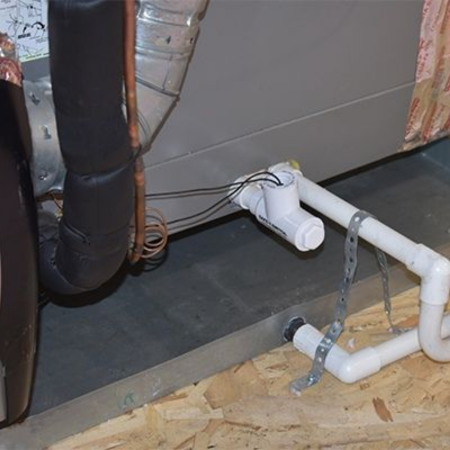
After that, reattach the drain line. Make sure it links to the new pan. It’s critical for proper functioning.
Check for leaks. Pour some water into the pan. Watch for any sign of leakage.
Lastly, reassemble the unit. Follow the disassembly steps in reverse. Make sure every part is in place.
This entire process demands patience. Be gentle. Take your time.
In case of any difficulties, don’t hesitate. Call a professional. Safety and accurate repair are key.
Now, your new drain pan is installed. Well done! With this, you’re ready to use your HVAC system again.
Step 6: Replace the Front Panel
Start by aligning the front panel with the unit. Ensure it fits snugly. Then, secure the panel. Use the screws removed earlier.
Tighten them properly. Next, inspect your work. Ensure the panel isn’t loose. A firm fit is crucial. Double-check all screws.
Confirm they’re secure. Now, plug in the unit. Restore power. The HVAC system should be operational.
If anything seems off, call a professional. Never risk safety. Congratulations, you’ve successfully replaced the drain pan in your HVAC unit. Maintenance is key for long-lasting performance.
Step 7: Test the AC Unit
Turn on the AC unit. It should start without issues.
Listen carefully. No strange noises should be heard.
Check airflow. It should be strong and cool.
Leave it running. Monitor it for a few hours. Check for leaks. The new drain pan should stay dry.
Ensure it’s draining properly. Look at the drainpipe outlet. Check for abnormal heating. The unit should remain at a normal temperature.
If problems persist, don’t hesitate. Call a professional. It’s better to be safe.
Otherwise, you’re good to go. Enjoy your refreshed, functioning HVAC system.
Condensate Drain Pan Replacement Cost
The cost of replacing a condensate drain pan varies. Factors influencing cost include the HVAC unit’s model and the labor rate. A new pan may cost between $50 and $100 on average.
Professional installation can range from $200 to $400. DIY replacement can save on labor costs. However, remember the importance of proper installation.
Incorrect setup could lead to further issues.
Always consider hiring a professional if unsure. Ultimately, maintaining your HVAC system will prevent costly repairs over time.
Where to Buy Replacement Condensate Drain Pan
Numerous outlets sell replacement condensate drain pans. Online retailers like Amazon or eBay have various options. HVAC specialty stores offer pans too. Consider the model of your unit when purchasing.
Hardware stores like Home Depot or Lowe’s also keep stock. Always double-check the specifications of the pan before buying.
A mismatch can lead to improper fit and function. Remember, quality is important. Opt for durable material.
It should withstand the constant water flow and temperature fluctuations. Don’t compromise on quality for cost. A good investment now can prevent future expenses.
Conclusion
Regular maintenance and timely replacement of your HVAC system’s condensate drain pan can save you from unexpected breakdowns and costly repairs.
Be vigilant about signs of trouble like water leaks, abnormal heating, or a clogged drain pipe. Always prioritize quality over cost when buying a replacement pan – an initial high-quality investment can save you from higher costs in the future.
Ensuring the correct fit and function for your particular model is equally critical. Whether you choose to DIY or hire a professional for installation, ensuring a proper setup is crucial for the efficient functioning of your HVAC system.

- GE Profile Microwave Troubleshooting 4 Common Issues - September 3, 2024
- How to Microwave Toaster Strudel at Home - September 2, 2024
- How to Improve Microwave Exhaust Fan Efficiency? - September 1, 2024